
Why Proper Post Setting Prevents Leaning Fences
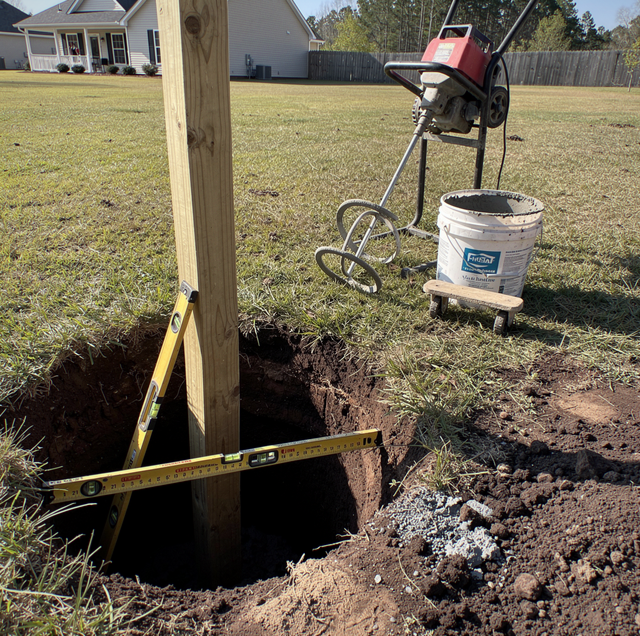
A fence stands or falls on a few feet of buried post that nobody ever sees again once the concrete cures. Everything above the ground, the panels, the rails, the gate, is just weight and surface area waiting for wind and time to test whatever is holding it up below grade. Get that hidden part right on installation day and a fence can hold its line for decades. Get it wrong, and the fence is on borrowed time no matter how good the lumber or hardware looks above the soil.
Most leaning fences trace back to a decision made in the first hour of the install, not a defect that shows up later. Post depth, hole size, footing material, and spacing are set once and rarely revisited, so any shortcuts taken during installation stay baked into the fence for its life. What follows is the mechanical side of that decision: what correct post setting does, what shortcuts undo, and what separates a fence that stays plumb from one that drifts within a few seasons.
What a Post Actually Has to Resist
A fence post is not just decoration standing in a hole. Once panels go up, wind pushes against the flat face of each one, and that sideways force travels down the post to the one point holding it in place: the buried section below grade. The taller and more solid the fence, the larger that push and the more it demands of the anchor underneath.
Resisting it takes two things together. The post needs enough depth to sit below the soil layer that moves with weather and temperature, and it needs enough surrounding material, concrete or well-compacted soil, gripping it tightly enough that wind cannot work it loose over time. A post deep enough but poorly anchored can still rock. A post anchored solidly but set too shallow can still tip. Getting both right the first time separates a fence that shrugs off wind for years from one that tilts after its first hard season.
Setting Depth Below the Zone That Moves
Soil near the surface is not as stable as soil a couple of feet down. It expands and contracts with moisture and temperature swings and shifts with every heavy rain or dry spell. A post set only into that active layer sits in ground that keeps moving around it, loosening its grip a little more with each cycle.
The fix is depth. A post needs to reach past the surface layer into soil that stays stable year-round, where it develops a firm hold. As a general guideline, roughly a third of a post's above-ground height should be set below grade, with taller or more solid designs requiring proportionally more below grade. A six-foot privacy panel and a three-foot picket fence are not carrying the same load, and their posts should not be set to the same depth just because it is convenient.
Getting this wrong rarely shows up on day one. A slightly shallow post can look plumb the week it goes in, because fresh concrete and undisturbed soil are both doing extra work to hold it upright. The trouble starts once the ground undergoes its first freeze-thaw cycle or a saturated week.
Concrete Footing vs Tamped Gravel
Once a hole is deep enough, what fills in around the post decides how well that depth translates into an actual hold. Two approaches dominate: concrete, or gravel compacted in layers as it goes in.
Concrete creates a solid, rigid collar around the buried post and resists side-to-side movement better than almost any other material available at installation time. It suits taller fences and corner or gate posts, wherever the push above ground works hardest. The tradeoff: it has to be mixed and placed correctly, filling the hole fully, and it needs time to cure before the post carries real load.
Tamped gravel works differently. Layers of compacted material lock together against the sides of the hole, draining water away from the post base rather than holding it there, which matters for wood posts prone to decay. The tradeoff is that gravel only works as well as the compaction behind it. Backfilling loosely, without tamping each layer, leaves the post sitting in soft material that gives under load almost as much as no footing at all.
Neither method beats the other in every case. What matters is matching the footing to the post, the height, and the soil, then doing the compaction or cure time it calls for instead of treating it as a formality.
Hole Diameter: Why Bigger Is Not Automatically Better
A hole that is too narrow leaves insufficient room for concrete or gravel, so the post ends up wedged against the sides, with a thin shell of footing doing very little work. A hole that is too wide takes far more concrete to fill, and a crew trying to save material sometimes backfills the extra width with loose dirt, which defeats the point of the larger hole entirely.
The useful range sits in the middle, generally three to four times the width of the post, wide enough for a meaningful collar of footing on every side without ballooning the material needed. Getting the diameter right at the start means every later step happens the way it is supposed to, instead of resorting to shortcuts to compensate.
Common Shortcuts That Surface Years Later
A fence rarely leans the same month it goes in. These shortcuts tend to hold for a season or two before the weakness shows up.
- Holes dug too shallow: Leaves the post in the same soil layer that shifts with every weather swing, rather than below it.
- Not enough concrete or gravel: A thin shell around the post looks finished but provides only a fraction of the holding power a full footing would.
- Poor compaction with gravel backfill: Dumping gravel in and moving on, rather than tamping in layers, leaves gaps that let the post shift under load.
- Wrong spacing for the fence design: Posts set too far apart for the panel height ask each one to resist more wind than it can handle.
- Rushing concrete cure time: Hanging panels or a gate before the footing has cured stresses the anchor before it reaches full strength.
- Skipping a plumb check before backfill sets: A post locked in off-angle starts fighting gravity instead of resisting it evenly.
Any one of these might not cause a visible problem right away. Combine two or three on the same line, and those posts are usually the first to drift once a wet season or a windy stretch tests the ground.
How Soil Type and Drainage Affect Long-Term Stability
The same footing, done well, can perform differently from one yard to the next, because soil is not uniform, and it plays as big a role in long-term stability as the setting work itself.
Dense clay holds water against a footing for long stretches after rain, which can slowly work at a concrete collar over years and keep wood posts damp enough to invite decay where they meet the soil. Sandy or loose soil drains faster but grips a post less firmly, so it relies more on the footing itself for the actual hold. Ground that stays consistently soggy, whether from a low spot or runoff collecting along the line, calls for extra attention to drainage.
A gravel footing at the low point of a yard, without any allowance for water to move away, ends up performing more like a reservoir than a footing. Reading the ground before digging and adjusting depth or drainage accordingly makes post setting a judgment call rather than a fixed formula.
Post Spacing and Wind Load
Depth and footing get most of the attention, but spacing matters just as much. Every post in a line shares the load of the panels next to it, and the wider the gap, the more sideways force each post resists on its own when wind pushes against the panel.
A taller, solid privacy fence catches far more wind than a shorter picket design or an open-style fence that lets air pass through, so its posts need closer spacing to spread that load across more anchors. Corner and gate posts carry an even larger share, since a corner takes pull from two directions and a gate adds swinging weight and repeated latching stress. Treating every post the same is a common reason corners and gates move first.
What a Professional Installer Checks Before the Concrete Goes In
The difference between a fence that holds its line and one that tilts often comes down to a short list of checks that get skipped when a crew rushes to finish a job.
- Depth against the fence design: The hole reaches past the surface soil layer and is deep enough for the panel height and material, not a standard depth applied to every job.
- Soil condition at the bottom of the hole: The base is firm rather than loose fill, disturbed soil, or standing water, since a footing poured over soft ground loses its anchor no matter how deep the hole goes.
- Plumb before backfill: The post is level and held steady while concrete or gravel goes in, rather than backfilled first and adjusted after.
- Adequate footing volume: The hole is filled fully around the post, with gravel tamped in layers rather than dumped in all at once.
- Cure time before load: Concrete reaches real strength before panels, rails, or a gate are hung on that post, especially at corners and gates.
- Spacing that matches height and exposure: Posts sit closer together for taller, solid panels and open ground, with corners and gates reinforced rather than treated like the rest of the line.
None of these checks are complicated on their own. What matters is doing all of them on every post, rather than treating a few as optional.
Frequently Asked Questions
A common guideline is to set roughly one-third of the post's above-ground height below grade, with taller or more solid designs requiring more embedment. The goal is to reach below the soil's surface layer that moves with the weather, not to hit an exact number.
Not always. Concrete offers more rigid holding power and suits taller fences, corners, and gate posts, while tamped gravel drains water away from the post and can suit wood posts where base moisture is the bigger concern. The right choice depends on the post, the fence design, and the soil.
Yes. Depth alone does not guarantee a hold if the footing was too thin, if gravel backfill was not compacted properly, or if the hole was too narrow to surround the post with enough material. Depth and footing quality both have to be right together.
It does. Dense clay holds moisture against a footing longer, while sandy or loose soil drains faster but grips a post less firmly, putting more weight on the footing itself. Reading the soil before digging helps decide footing choice and whether extra drainage is needed.
Corner posts carry pull from two directions, and gate posts absorb the repeated stress of swinging and latching, so both handle more sideways force than a line post. Extra depth or larger footings at those spots help them keep up with demand.
Concrete needs time to reach its full strength before it can carry a load, so hanging panels or a gate too soon can stress the footing before it is ready. Waiting out the cure time protects the work already done at the post.
Post setting is the one part of a fence install that nobody sees again once the yard is cleaned up, and it is also the part that decides how long everything above it stays standing. Depth below the moving soil layer, a footing matched to the post and design, honest compaction or cure time, and spacing that respects wind and corner stress: none of it is complicated, but skipping any piece shows up later as a lean that traces back to installation day.
Get a free on-site consultation before your next fence goes in — have a pro confirm the post depth, footing, and spacing your yard actually needs. The Fayetteville Fence Company LLC serves Fayetteville, Hope Mills, and Raeford. Call (910) 994-3634.
